PAVER SEALING

Paver sealing is an incredibly complex topic. There is actually so much to talk about that we wrote a book on it! And we pulled all of the most valuable content from that book and have published it right here ... 

Types Of Paver Sealer

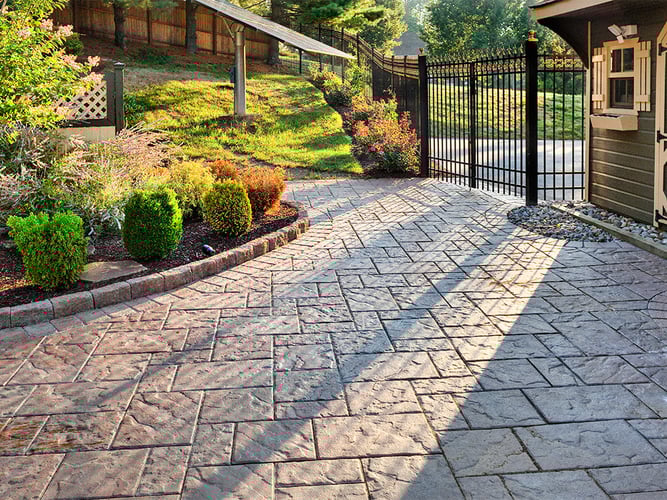
First thing’s first. Before delving into the nitty-gritty, we’re going to cover the basics. Understanding the types of paver sealers available on the market will better position you for success on future sealing jobs. In this section, we'll give you a clear understanding of how different sealers work and enable you to make sound product selections for just about any type of project you’re faced with. (Even if you’re a pro, a little refresher never hurts!)

Solvent-based vs. Water-based Sealers

Knowing the facts about solvent-based vs. water-based sealers will make all the difference in your outdoor paver project. While they do have some characteristics in common (i.e. protection against wear and tear, a level of stain and UV resistance, a fairly easy application process) it’s the differences that ultimately determine which type of sealer will best fit your project.

Types of paver sealer.jpg

Solvent-based sealers:

  • May offer color and gloss enhancement (often better than water-based products)
  • Are sensitive to moisture before application
  • Dry quickly (and are prone to spider webbing)
  • Are easy to repair
  • Are generally longer lasting than water-based sealers

Water-based sealers:

  • May offer color and gloss enhancement
  • Are environmentally friendly
  • Clean up with water
  • Tolerate damp surface application
  • Are sensitive to moisture after application
  • May be more difficult to fix if something goes wrong

eBook-On-Paver-Sealing-CTA

Next we’ll explain how to handle previously sealed pavers but it’s important to note here that water-based sealer can never be applied on top of solvent-based sealer!


Topical vs. Penetrating Sealers

We’ve discovered that general education on the application and usage of sealer proves to be quite limited (and often conflicting). Unfortunately, making a mistake on a sealing job is costly and very labor-intense to fix. So it’s critical to choose the right product and apply it precisely as specified by the manufacturer.

Text-Img.jpg

Topical Sealers

The bulk of sealers on the market are topical, or film-forming, sealers. They are fairly easy to use and offer a degree of stabilization to the joint sand. However, product features can vary from one topical sealer to the next. For example:

  • Acrylic topical sealers are easily scratched
  • Solvent-based topicals are simple to touch up
  • Water-based acrylic topicals are not easily repaired

Penetrating Sealers

As the name implies, penetrating , or non-film-forming, sealers are formulated to work down into the paver and create an invisible layer of protection against stains, de-icing salt damage, etc. Penetrating sealers work by increasing surface tension to cause beading. These products will create hydrophobic water-shedding, meaning water will quickly form into droplets on the sealed concrete paver surface instead of soaking in. While penetrating sealers will not provide gloss enhancement, they offer superior levels of abrasion, heat, and UV resistance.

Sealer Classifications

Sealer Classifications

As if things weren’t already confusing enough, sealer types can be broken down even further! Let’s explore the characteristics of some of the most common sealer classifications.

Acrylic Sealers

Acrylics are an economical sealer choice. They’re available in both water-based and solvent-based varieties and are fairly easy to apply. Acrylics typically come as a single component, or 1K (a.k.a. no mixing required), and provide excellent gloss and color enhancement. The downside: they’re moisture sensitive after application and may scratch easily.


Fluorochemical Sealers

Fluorochemical sealers, while relatively expensive, will last for years. Fluorochemical sealers are generally easy to apply. Because they are a penetrating type of sealer, they will not provide any color or gloss enhancement.


Silicone Sealers

Silicones are another economical sealer option. They have a moderate life-span and are available as a single component penetrating product. Silicones will not provide any kind of gloss enhancement but they may slightly enhance the color of the pavers.


Polyurethane Sealers

Polyurethanes are an excellent sealer choice however, that comes at a price because they’re typically expensive. They’re available in single component (1K) or two parts (2K). Two-part products must be mixed on-site and can be tricky to apply properly. Polyurethanes are also available in both water-based and solvent-based versions. They’re tougher than acrylic sealers, providing high levels of UV- and chemical-resistance.


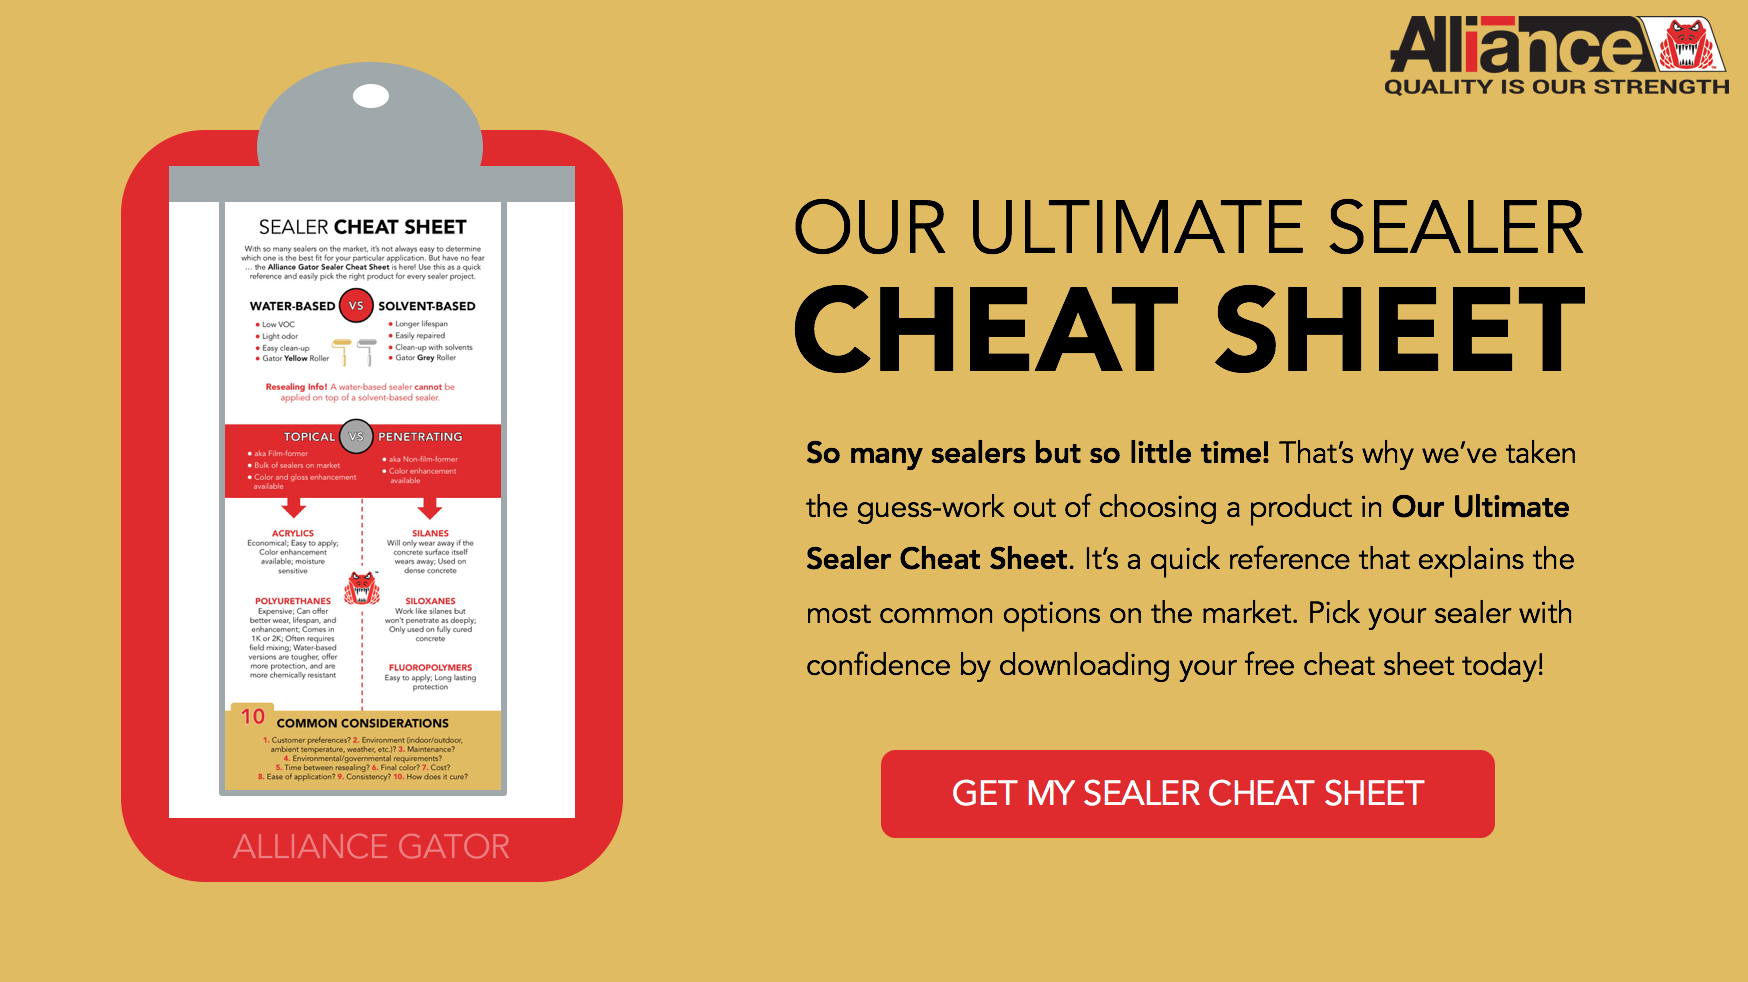
That was a lot of information … we know! So we’ve developed the Ultimate Sealer Cheat Sheet that you can store on your smartphone for reference anytime you need it. You can download it by clicking the button below!


Alright, so now that we’re up to speed on all of the different types of sealers, let’s talk preparation tips!


New Call-to-action

Preparation Tips

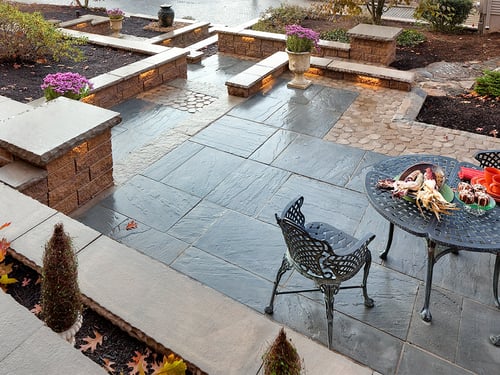
Paver sealing is a great way to protect the investment of an outdoor patio or walkway. However, failing to responsibly prep for the process puts the entire surface in jeopardy. In this section, we’re going to outline everything that needs to be done before a sealing job.

4 Things To Do Before Sealing Your Pavers

There are four primary tasks that must get accomplished prior to starting each and every sealing job. Here's the checklist! 

4 Things To Do Before Sealing Your Pavers.jpg

Paver Sealing Checklist

1. See what the manufacturer has to say.

Before even making a trip to your local hardscape supply store, take time to review the paver manufacturer’s specifications for sealing. This will give you important insight on the types of sealing products that are safe to use on the pavers and the appropriate waiting period before applying sealer to newly installed pavers. 


2. Check the weather.

In most cases, a sealer should only be applied to pavers that are completely dry. So confirm there won’t be any rain in the forecast for a full 24 hours prior to starting your project. (You also don’t want any rain for 24 hours after a sealer application.) Lastly, a sealing job should not be performed in extreme temperatures. As a rule of thumb, a surface temperature of 50-80 degrees is usually ideal.


3. Clean.

It’s mandatory! We truly can’t stress the importance of this step enough! We’re going to delve into this subject more in the next section but, for now, we’ll just point out how critical it is to complete a thorough efflorescence cleaning before getting started.


4. Remove contaminated sand from the joints.

Be sure to remove any contaminated sand from the joints and replace it with polymeric sand. If you’re going to replace sand, the efflorescence cleaning should be done after you replace the polymeric sand and before you seal. Ok, now we have to revisit the topic of efflorescence cleaning!

Why Efflorescence Cleaning Is Mandatory.jpg

Efflorescence Cleaning (and why it's mandatory)

Efflorescence cleaning is a mandatory step when sealing pavers. And it goes way beyond just the removal of efflorescence. There are four main reasons why pre-cleaning is a must for sealing jobs.

1. Removal Of Efflorescence (Yes, we’ll start by stating the obvious.)

Derived from the Latin word efflorescere, which means to blossom out, efflorescence is the migration of salt to the surface of a concrete paver. It’s a natural occurrence that can happen in any cement-based product and, in many cases, will disappear on its own over time (usually after the first year of installation).


Here’s the deal with efflorescence and sealing … you do not want to seal before the pavers have had the chance to “breathe” and go through their normal efflorescence cycle. By sealing too soon, you’ll run the risk of trapping migrated salts beneath the coating of sealer. And the only way to remove the haziness at that point will be to strip the sealer and then clean the efflorescence.


“But the patio was installed five years ago and doesn’t appear to have an efflorescence issue. Why should I still use an efflorescence cleaner?” Great question … which brings us to our next three points!


For more info on how to remove efflorescence, read this blog post: The Top 5 Things You Need To Know About Getting Rid Of White Haze On Your Pavers


2. Removal Of Dirt/Debri

Would you paint the walls in your house without wiping down the dust, dirt, and cobwebs first? Probably not. The dust and debri would get trapped and cause obvious imperfections after the paint dries. The same holds true for sealing an outdoor surface.


It’s critical to thoroughly remove dirt, pollen, leaf residue, etc. before sealing. Anything that’s sitting on the surface when you seal it will become trapped … and just like in the ‘painting a dirty wall’ analogy, there will be obvious imperfections after the fact. It’s a very common misconception that using a sealer will help to cover up imperfections on the pavers. The reality, in fact, is that a sealer will typically accentuate stains, efflorescence, etc. Performing a thorough efflorescence cleaning prior to sealing will help you avoid the risk of trapping, and essentially highlighting, pre-existing dirt and stains.


(Note: Heavy duty stains caused by oil, tar, rust, etc. will require a specially formulated cleaner for treatment.)


3. Deeper Penetration Of Sealer

An efflorescence cleaner will make pavers look more clean and vibrant without discoloring or damaging the surface. This is a huge plus. Even more importantly, however, is that efflorescence cleaning will thoroughly clean the pores of the pavers and allow for a much deeper penetration of the sealer when it’s applied. This will not only elongate the life of the project, but the product will now be able to perform at the most optimal levels.


4. Better Bonding

Ok, let’s use another paint analogy. Have you ever tried to paint a piece of wood that hasn’t been sanded or roughed up a bit? The paint will have difficulty adhering to the surface. The same holds true for trying to seal pavers that haven’t been cleaned with an efflorescence cleaner. Using an efflorescence cleaner will slightly etch the surface of the pavers, which will allow the sealer to bond correctly. Again, it ties back into optimal product performance!


Now that you will never again seal a paver project without cleaning it first, it’s time to move on and discuss how to handle jobs that were previously sealed.

How To Handle Previously Sealed Pavers

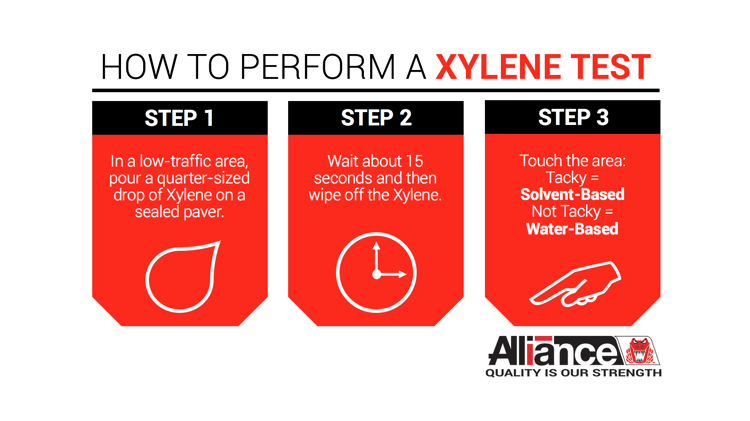
As we talked about in the first section, a water-based sealer should never be applied on top of pavers that were previously sealed with a solvent-based product. If you’re sealing a pre-existing surface, it’s a best practice to verify if the pavers had been sealed before and what kind of sealer was used. And unless you have an extremely reliable source who can provide you with this information, it’s wise to make the determination yourself. Here’s how ...

How To Perform A Xylene Test

How To Tell If The Pavers Were Previously Sealed

Drop a very small amount of efflorescence cleaner on a paver. If it doesn’t fizz, the chances are the surface has been sealed before.


How To Tell What Type Of Sealer Was Previously Used

Choose a low-traffic area (i.e. a corner) and pour a quarter-sized drop of Xylene onto a paver. Wait about 15 seconds, wipe off the Xylene, and touch the area. If it feels tacky, it means a solvent-based sealer was used. If it’s not tacky, a water-based sealer was used.


How To Perform An Adhesion Test

After you determine whether to use a solvent-based vs. a water-based sealer, you can perform an adhesion test to ensure the product will properly adhere to the previously sealed surface. First, choose a small test patch in a low-traffic area. Make sure the surface is clean and dry before applying a coat of the new sealer. Allow the product to dry for a full 24 hours. After the sealer has completely dried, cut a tic-tac-toe pattern on top of it using a utility knife. Press hard enough to cut through both the new and old sealer coatings. Next, place a piece of duct tape on top of the tic-tac-toe pattern, press it down, and then tear it back off. If the new coating of sealer doesn’t get pulled off with the tape, you have good adhesion and can proceed using the product.


Some other checklist items ...

Before getting started with your sealing project, there are just a few more checklist items you’ll want to cover.


Check for dryness.

Earlier we had mentioned that pavers should be completely dry before applying a sealer to them. A saturated paver or joint will not accept the sealer properly. (And don’t forget: a solvent-based sealer should never be mixed with water!) To ensure the surface is 100% dry, you can tape a small square of Saran Wrap somewhere on it. Step away for about 45 minutes and if there’s no condensation when you come back, you’re good to go!


Double check for stains.

Even if you use an efflorescence cleaner, there may be tougher stains that get left behind. You will absolutely want to treat those prior to sealing. Sealer is more likely to highlight pre-existing stains, not hide them!

The Ins & Outs Of Application

It’s application time! Let’s review the tools needed, general steps of the process, and some tricks of the trade!

Paver Sealers.jpg

Tools Needed

Besides the sealer itself, here’s a list of everything you’ll want to bring along to the job site ...

Sealing Tools Checklist

  • Safety Glasses
  • Mask
  • Gloves
  • Work Boots
  • Waterproof Overalls
  • HVLP Sprayer*
  • Roller**
  • Roller Handle
  • Metal Paint Tray

*We recommend the Chapin Xtreme with 0.5 / 1.0GPM brass nozzle.

**Solvent-based sealers require a special roller that can hold up to the chemicals in the sealer. If you’re using Gator products, the grey roller is for solvent-based sealer and the yellow roller is for water-based.

Step-by-Step Sealer Application Guide

After completing the efflorescence cleaning and all other necessary preparation steps, the application may commence. Outlined here are the three primary steps required! (Note: After efflorescence cleaning, you should allow the pavers to dry for 24-48 hours before sealing.)

Application of Paver Sealer.jpg

Step 1

Using an HVLP sprayer, apply a coating of sealer. (If you’re using a joint stabilizing sealer, apply a flood coat.)


Step 2

Even the sealer out using a roller. Make sure there is no puddling or buildup of sealer. If you’re using an Alliance sealer, one coat is all it takes. To put things in perspective, one gallon of sealer should cover approximately 175 square feet of concrete pavers. However, results may vary based on the pavers’ age, density, and water absorption characteristics. For joint stabilizing sealers, use a foam Squeegee to spread the sealer into the joints and remove puddling or ponding on the surface.


Step 3

Allow the pavers to dry for a full 24 hours.

3 Cleaning & Sealing Hacks

Everyone can use a tip or two on how to make their job easier, right? We’re closing out this section with three handy hacks that will save you time and energy on future sealing jobs. Let’s go!

Cleaning And Sealing Hacks for Pavers.jpg

1. How to dilute efflo cleaner the easy way.

If you’ve ever used Gator Efflorescence Cleaner, then you know it needs to be diluted first. The ideal mixture is four parts water to one part cleaner. Forgot your measuring cup? Not an issue! Measuring out and mixing the proper ratio can be done in as little as three steps! Here’s how:


  • Step 1 Fill a 5-gallon bucket to the brim with water.

  • Step 2 Take your unopened gallon of Gator Efflorescence Cleaner and plunge it into the bucket. Now watch as basic water mechanics takes place! The volume of water that gets displaced will be exactly equal to the volume of the immersed object (a.k.a. the gallon bottle of efflo cleaner).

  • Step 3 Take the bottle of efflo cleaner back out of the bucket of water, open it up, and pour the liquid in! You will now have the perfect ratio of four gallons of water to one gallon of cleaner!


2. How to clean stubborn organic stains in a snap.

Pool Shock. It’s a handy little product that’s not only great for cleaning pools, but for sprucing up dirty pavers, too! Pool Shock is a dry powder (available in 1 lb. bags) and can be found at pretty much any retailer that sells pool supplies. It’s a highly concentrated bleach and it’s excellent for stain removal. Simply mix a half bag of Pool Shock into a 5-gallon bucket filled with warm water, pour the mixture over any stubborn organic stains on your pavers, scrub with a good stiff bristle brush, rinse, and watch them disappear!


3. How to remove that dreaded stain caused by purple primer.

Irrigation contractors often use a purple colored primer when binding the pipes for sprinkler systems. If they happen to drip any of this product on unprotected pavers, removing the purple stain is essentially impossible unless you know this well-kept hack ...


Irrigation primer comes in two forms: a purple version (mentioned above) and a clear version. For the most part, the only difference between the two is the dye! To remove a paver stain caused by the purple primer, purchase the clear version of the same formula originally used. Apply the clear primer on top of the purple stain and it will completely.


For more hacks, read our blog post: 6 Cleaning & Sealing Hacks For Hardscape Professionals

Sealer Issues

Sealer issues are a very common occurrence in the hardscape world. Lack of preparation … weather … temperature … improper application technique. These are just a few of the things that can cause a sealing job to go very wrong. In this section, we’re going to share the most common issues we see in the field and how to prevent making the mistakes that ultimately lead to them. We’ll also discuss the types of issues that can and can’t be fixed.

Prevention

Getting a sealing application right the first time is a must. So let’s get straight to it. Here are the most common sealer issues and quick advice on how to prevent them!

How To Prevent Paver Sealing Issues.jpg

Plastic Appearance

A plastic appearance on a sealer job typically stems from over-application of the sealant. To ensure an even coat of sealer, it’s best practice to first use a sprayer and then back roll.


White Lines

White lines on a sealed surface are generally linked to one of two causes: 1. rolling technique or 2. an unclean surface. Prior to performing any sealing job, you must clean the surface with an efflorescence cleaner. Not only will this remove any dirt or debris, but it will also ensure a deeper penetration of the sealer and optimal product performance. To prevent roller lines, the sealer can be applied using a sprayer and then gently back rolled to even it out. Also, make sure you are not trying to roll the sealer as it is drying.


Sealer Not Sticking To The Surface

We see many problem jobs where the sealer doesn’t stick to the surface. Nine times out of ten, this is a direct result of an unclean surface. Before sealing, perform an efflorescence cleaning!


Flashing

Flashing refers to an uneven finish of the sealer. We most often see this occur on jobs where the surface temperature and/or air temperature was very hot when the sealer was applied. As a general rule of thumb, a hand test should be conducted if temperatures seem questionable. If the pavers are too hot to touch, then they are definitely too hot for sealing. (Usually anywhere between 50-80 degrees is ideal.) In warmer months, it may be necessary to seal earlier in the morning. An IR thermometer is a great investment if you plan on offering sealing services regularly.


White Spots

Checking the forecast before any hardscape project is a must … especially when it comes to sealing projects. If your job becomes plagued by white spots, it’s usually an indication of trapped moisture. The spots can show up days, or sometimes even months, after the project is finished. To avoid the damaging effects of moisture, be sure rain isn’t predicted for at least 24 hours after the sealer application.


Cloudiness

If the pavers appear to have a milky white coating after sealing, it can be attributed to a few different factors. If a water-based sealer was used and temperatures were too low at the time of application, this could result in cloudiness. It could also mean that moisture got trapped in the sealer while it cured. Lastly, if sealer was applied to freshly poured concrete, this could also result in a milky white coating. Check the temperature before getting started. Again, 50-80 degrees is ideal. Also, be sure to there is no rain in the forecast for 24 hours after the project.


Yellowing

The resins used in some sealers aren’t UV stable and can yellow over prolonged periods of being hit by direct sunlight. If you’re sealing a surface that will be getting hit by direct sunlight, make sure the product you use is UV stable. We get it … mistakes happen. Let’s move on and find out which ones can and can’t be fixed.


Recommended Read: 6 Sealer Don'ts

How To Fix Paver Sealer.jpg

Can it be fixed?

Mistakes on sealer jobs are easy to make yet … for the most part … not so easy to correct. While the extent of damage truly needs to be assessed on a case-by-case basis, we’re going to first share a few fixes that might save you from having to strip the job. Then we’ll move onto the types of issues that can’t be fixed.

Time

Sealers will wear and age with time. For example, roller marks or streaks from uneven application that are prominent upon completing a job will most likely dissipate after being subjected to the elements and normal wear and tear. However, if time is not on your side, you may want to consider this next fix …


Xylene

Xylene can be used to re-emulsify the existing coating of sealer in order to repair issues such as roller marks, streaks, a plastic-like appearance, or white spots. (If a water-based acrylic was used, you have a 24- to 48-hour window after applying the sealer to attempt repairs with Xylene.) Depending on the severity of the problem, it may require saturation, aggressive scrubbing, and repeated applications to re-emulsify the sealer.


Efflorescence Cleaner

Depending on the type of sealer used, an efflorescence cleaner may be able to remove excess sealer that shouldn’t be on the surface. However, efflorescence cleaner will not work on any type of cured acrylic sealer.


Pressure Washing

Using a hot pressure washer is another possible way to remove excess sealer from a surface. If a water-based sealer was used, pressure washing is only an option if the sealer hasn’t dried. Another important thing to note is that pressure washing will not remove efflorescence. In fact, it will end up making it worse!


Resealer

Using a resealer may help to rejuvenate existing water-based or solvent-based coatings.


Again, the best approach to handling sealer problems is dealing with them one-by-one. There is not a one-size-fits-all solution to fixing issues (unfortunately). And there are some sealer issues that cannot be fixed at all.


How To Prevent Common Sealer Issues

How To Fix Common Sealer Issues


Here’s a list of situations that will require the sealer to be stripped:


Stains or Efflorescence Trapped Underneath Sealer

Dirt, stains, or efflorescence trapped under a film-forming sealer cannot be removed without removing the coating first. (Hence the extreme importance of properly prepping first.) In rare instances, cleaning may work on a penetrating (non-film-forming) sealer but it also may not ... so clean first!


Cured Water-based Acrylics

After 48 hours, there are next to no alternatives for repairing or correcting mistakes made with a water-based acrylic sealer. While a resealer or a solvent-based sealer may mask the issue, it also may not. The only real option is to strip the sealer and start from scratch.


Excessive Moisture Problems

If the sealed surface has turned hazy or white, it’s most likely due to excessive moisture. If the problem is ongoing, any fix will only be temporary.


New Call-to-action

Sealing Natural Stone

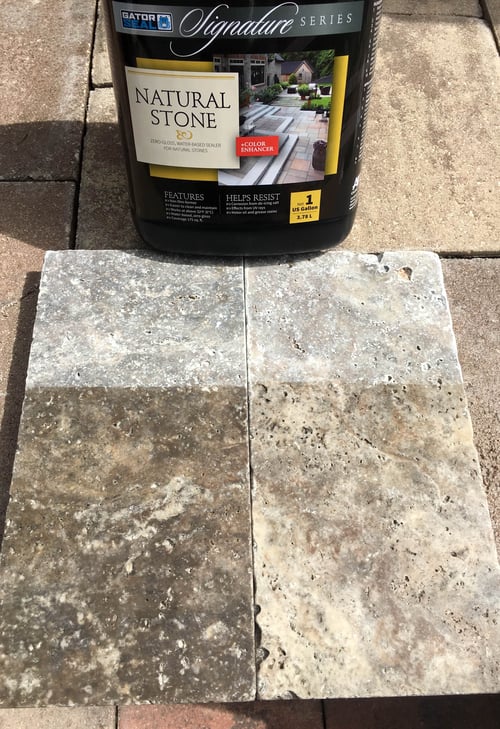
Each type of natural stone features a unique set of characteristics that will ultimately determine the effectiveness of sealing. In this section, we’ll detail the things you need to know before applying sealer to a natural stone project.

Natural Stone Characteristics

Every natural stone can be broken down by four characteristics: 1. Density, 2. Porosity, 3. Permeability, and 4. Absorption. Let's take a closer look ...

How To Seal Natural Stone.jpg

Density

Density refers to the weight of a stone and is measured relative to the density of water (1 gram per cubic cm). Most types of stone in the earth’s crust have similar densities. A dense stone like granite will offer superior durability and strength. Other examples of dense stones include basalt, dolomite, and slate.


Porosity

Porosity is the amount of open space between mineral grains in a stone (and generally dictates permeability). A very porous stone, like sandstone, will absorb liquids quickly. Since all natural stones are porous, they are susceptible to staining, etching, spalling, etc.


Permeability

Permeability is the ability of liquids to move through a stone. While permeability is closely linked to porosity, a stone can have low porosity and high permeability depending on its grain structure (i.e. bluestone).


Absorption

When it comes to sealing natural stone, absorption is what we care about! It will determine two things: 1. How prone the surface will be to staining and 2. How to properly protect that surface. Depending on the type of stone you’re working with, the absorption of the sealer will differ from one material to the next. This will have a direct impact on your coverage rate, color enhancement achieved, and the longevity of the sealer.


New Call-to-action

Sealing Challenges & Considerations

Because characteristics vary greatly from one type of natural stone to the next, it’s impossible to present one sealer and one application method to handle all stone types and installation conditions.


As we mentioned earlier, depending on absorption, sealer coverage rates will vary from stone to stone. It’s also important to note that very dense stone may require wiping off excess sealer to avoid creating a slippery surface when it dries.


Essentially, the moral of the story with natural stone is to get educated on the type of stone you’re working with and then carefully proceed from there! Once you know and understand the characteristics of the stone in your project, it will be time to move onto yet even more considerations …

Challenges Of Sealing Natural Stone.jpg

Stain Resistance

One of the main reasons for sealing an outdoor natural stone surface is to protect it from staining. Before choosing a product, consider the different types of stains that might be prone to the particular area you’re sealing … then be sure the sealer you choose will in fact offer protection against those types of stains.


Breathability

While breathability is oftentimes overlooked, it’s definitely an important quality that a natural stone sealer should possess. If moisture-vapor transmission is inhibited, it can lead to deterioration of the stone as well as spalling of the sealer. Penetrating sealers are generally more breathable and should be considered for sealing natural stone projects.


Freeze/Thaw Stability

Freeze/thaw cycles can have a tremendous impact on outdoor hardscaping. When choosing a natural stone sealer, make sure the product is designed to expand and contract with ground movement. An inability to do so will ultimately lead to failure of the sealer.


Easy Reapplication

Due to normal wear and tear, a natural stone surface will most likely need to be resealed over time. It’s wise to choose a product that can easily be reapplied without having to first strip the existing layer of sealer.


Slip Resistance

Maintaining slip resistance is an important consideration for any sealing project. Penetrating sealers are designed to work deep within the stone to block pores and capillary pathways, making them a great choice for natural stone.

Sealing Natural Stone

When applying a natural stone sealer, you should always carefully follow the instructions provided by the specific manufacturer. However, here are some basic rules to follow.

Sealing Natural Stone.jpg

How To Apply A Natural Stone Sealer:

  • First, clean the natural stone surface with an efflorescence cleaner.

  • Wait for the stone to completely dry.

  • The ideal surface temperature for sealing is typically between 50-80 degrees. (Note the “surface” temperature is usually different from “air” temperature. For example, it may be 80 degrees in the air but the stone could be 100 degrees or more!)

  • Make sure there is no rain forecasted for 24 hours.

  • Work in small sections at a time (i.e. 60 square feet) using a solvent-resistant pump-sprayer.

  • Use a foam roller or Squeegee to remove excess sealer from the surface.

  • Allow the sealer to penetrate for 5-10 minutes.

  • Wipe and remove any excess sealer with a clean, dry, lint-free cotton cloth.


And here's a few more application tips and tricks!


  • Use a sprayer with a .5 GPM tip or smaller.

  • Spray a light coat to minimize puddling.

  • Depending on the type of natural stone, the coverage of the sealer will vary. A lower absorption stone (i.e.granite or travertine) means a higher coverage rate (and reduced color enhancement). A higher absorption stone (i.e. limestone or sandstone) will require more sealer to get the job done.

  • Backroll immediately. A roller will work on all surfaces while a foam Squeegee is best suited for smooth surfaces.

  • The wiping of excess sealer should occur within minutes (1-5 minutes on hot sunny day or within 15 minutes at cooler temperatures or overcast).


By knowing the characteristics of the stone that you are sealing and closely following the manufacturer’s instructions, you’ll be well on your way to a profitable project that looks great.

Selling Your Cleaning & Sealing Services

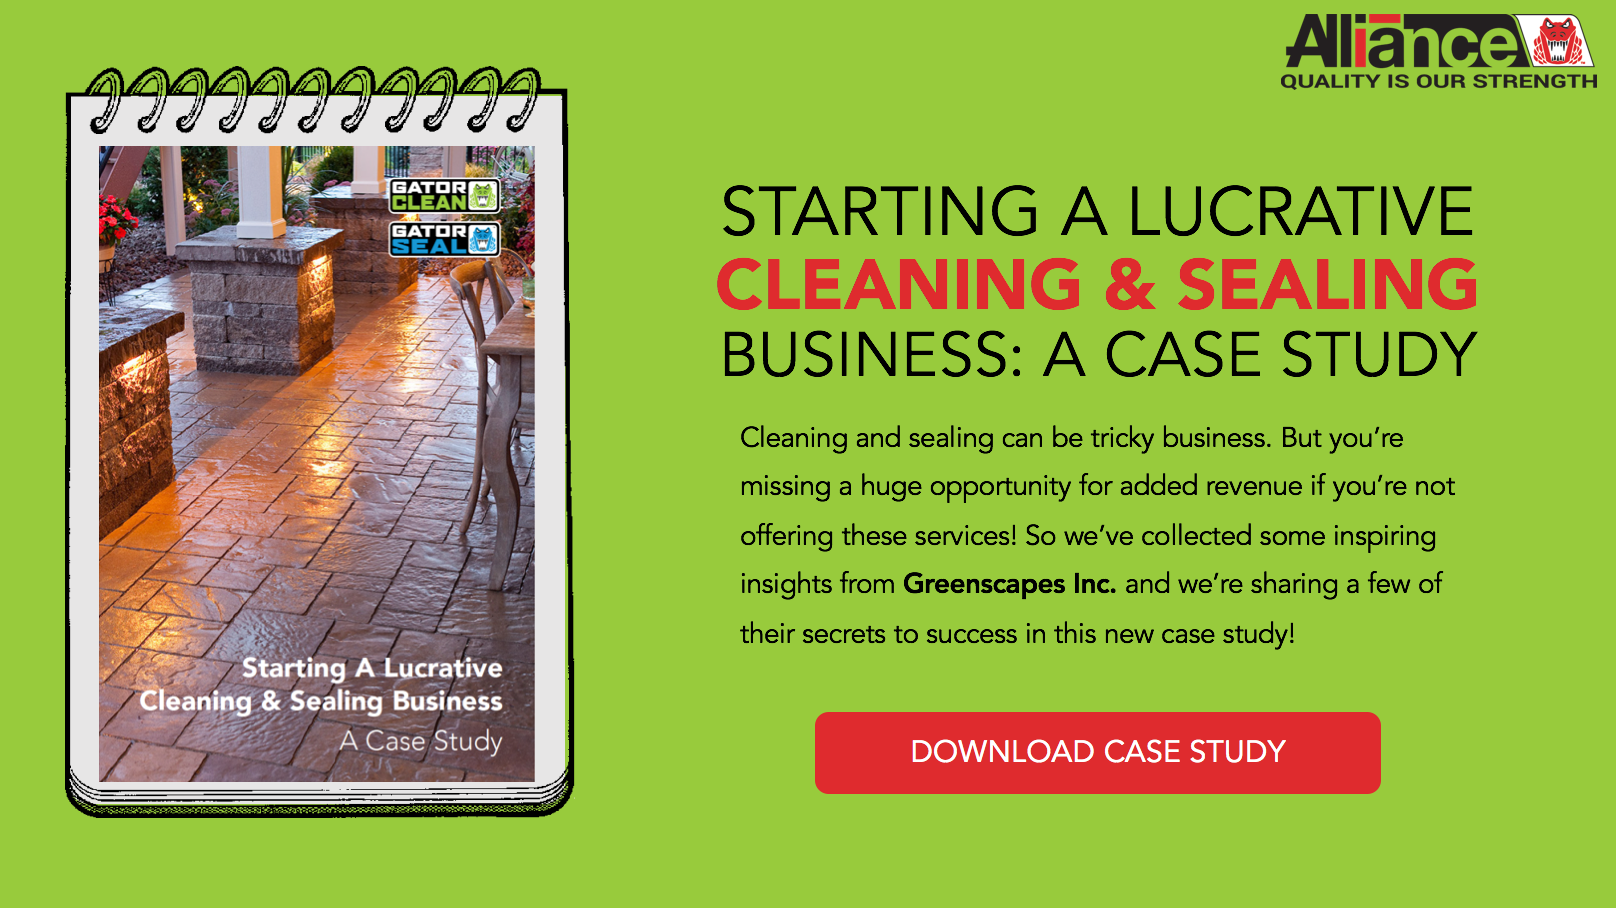
The three keys to being successful in the cleaning and sealing business are 1. Product knowledge 2. Application knowledge and 3. Salesmanship. The previous sections concentrated on items one and two … now it’s time to focus on selling your services the smart way!


For an in-depth look at a company that has aced the art of selling their cleaning and sealing services, be sure to download our case study: Starting A Lucrative Cleaning And Sealing Business.

Starting A Lucrative Cleaning & Sealing Business.jpg

10 Common Considerations

The first and most critical step in working with a client who wants an outdoor surface sealed is understanding their desired outcome and then being able to align the right product for the job. Here is a list of ten considerations you should make for every sealer job:

10 Considerations

  1. What is the client’s preference and desired outcome? Stain protection? Color enhancement? Make sure you have a clear understanding of what the client wants and that you’re both on the same page.

  2. What’s the overall environment? Will there be drastic temperature changes? What’s the weather like?

  3. What’s the level of maintenance required? Is the client comfortable with it? 

  4. Are there environmental/governmental requirements or restrictions on the type of sealing product that can be used?

  5. When will the surface need to be resealed and what will that process look like?

  6. If the client is looking to achieve color enhancement, what does that final color look like after the sealer is applied? (Actual sealed samples should always be used as a visual!)

  7. What’s the cost of the project and does it fit the client’s budget?

  8. What’s the ease of application for the sealer?

  9. How consistent will the sealer appear across the application?

  10. How does the sealer cure? What instructions need to be conveyed to the client after the job is complete?
New Call-to-action

Educating Your Clients

After you have a solid understanding of your client’s preferences and desired outcome, it will be your responsibility to recommend a sealer that will best fit the project. If the client’s expectations are unattainable, it’s your job to give them the reasons why and suggest other viable solutions.


At the forefront of this process stands your product knowledge! You’re the expert and your client is relying on you. 

Educating Your Clients On Sealer.jpg

1. Show sealed samples.

If the client is looking for gloss or color enhancement, you should always present them with a sealed sample so they have a visual of what the end result might look like. You’ll also want to discuss if and how sealing will impact slip resistance. Once they decide, have them sign and date the back of their desired sample with a Sharpie.


2. Give an overview.

Briefly take your client through the steps of sealing so they know what to expect on the jobsite. Explain the general sealing process and clarify the length of time their surface will be off limits for.


3. Warn about weather.

As we discussed earlier, the weather plays a huge role in the successful outcome of a sealer project. Let your client know what the optimal conditions need to be in order to complete the project and that rain or extreme temperatures may move the date.


4. Be prepared with a quote.

When your client eventually requests a price, don’t fumble around and take wild guesses at the numbers. If you’re in the business of cleaning and sealing, it’s imperative to have a formalized quoting process. When you present an itemized (and well-thought-out) quote to your client, it will significantly boost their confidence in you and certainly elevate your level of professionalism.


Be sure to download a copy of our Cleaning & Sealing Quote Worksheet to help get started!


5. Discuss future maintenance.

Educate your client on how often they should reseal their outdoor surface in order to keep it protected and looking sharp. Depending on the level of traffic it gets, the timeframes may vary so be sure to have an idea of average usage. Also discuss the importance of routine cleaning and cross-sell these other services!

Estimating A Sealing Job

Most experienced contractors can agree there is no cookie cutter approach to estimating sealing jobs. Depending on the product used, the application process, and any unique circumstances, quotes will typically have to be prepared on a case-by-case basis. That said, time should always be invested in visiting a job site to accurately assess the scope of work. While there isn’t a black and white estimating template we can give you, here are some common expenditures you should consider for each project:

Text-Img.jpg

Labor

What (besides sealing) will your crew be doing on the job site? Does contaminated joint sand need to be removed? Are there any low spots that need to be raised? During your site visit, take note of every single task that will affect your labor costs and be sure they’re built into the quote.


Materials

Again, the site visit is critical because it will give you a sense of which products (and quantities) are needed. If you’re raising areas of the surface, replacing polymeric sand, or performing stain removal, make certain you’re accurately accounting for product quantities and costs.


Tools

What tools will you be using for the job? Here are some common ones you’ll want to consider building into your price: pressure washer, compactor, leaf blower, and sprayer surface cleaner. Don’t forget to include your overhead recovery costs, too!


The Alliance Gator Cleaning & Sealing Quote Worksheet provides a great roadmap to estimating. You can download a free copy by clicking below!


Quote-Worksheet-CTA


Marketing Your Landscaping or Hardscaping Company.jpg

Marketing Tips

While word of mouth is one of the best forms of advertising, there are other creative ways to market your services in an effort to generate new business. Try some of these techniques to get the ball rolling …

Social Media

Is your business on Facebook/Twitter/Instagram/etc.? Leverage your social networks by sharing exquisite project photos and testimonials from real customers.


Create A Digital Portfolio

Collect eye-catching photos of your best work and organize them into a digital portfolio. This can be a useful tool for sharing on social media or even when emailing prospective clients. For more details, check out our blog post 7 Tips For Creating A Captivating Hardscape Portfolio For Your Next Sales Call … then download the free template we have waiting for you!


Cross-sell

Just completed a new patio installation? Mention your cleaning and sealing services upon wrapping up the project. You can also send email or simple post card reminders to those clients who may be due for routine maintenance!


Get Found Online

Do you have a website? Or maybe you have a website but aren’t diligent about updating it? A professional online presence will put you light-years ahead of your competition. And platforms such as SquareSpace and Wix make it simple and easy for someone with zero web or graphic design experience to build a modern website from scratch!


Here are a few things your website should feature:

  • Relevant keywords
  • Mobile-friendliness
  • A blog (with social sharing buttons)
  • Simple navigation
  • Fast loading images
  • Your brand identity (colors, fonts, messaging, etc.)
  • A contact page
  • A healthy amount of negative space (a.k.a. go easy on the images and heavy use of text)
  • Appropriate meta descriptions (which summarize the content of each page) and unique title tags

In Conclusion

We’re ending on the same note we started with. Paver sealing is an incredibly complex topic! However, a little product and application knowledge puts you way ahead of the curve. We hope you gained some new insights from this webpage. Now get out there and showcase your Master of Sealing skills!

Alliance Gator Blog.jpg

Follow Our Blog!

To stay on top of all the latest hardscaping topics and trends, consider subscribing to our blog at blog.alliancegator.com.

FullBleed.jpg